
 Pin it
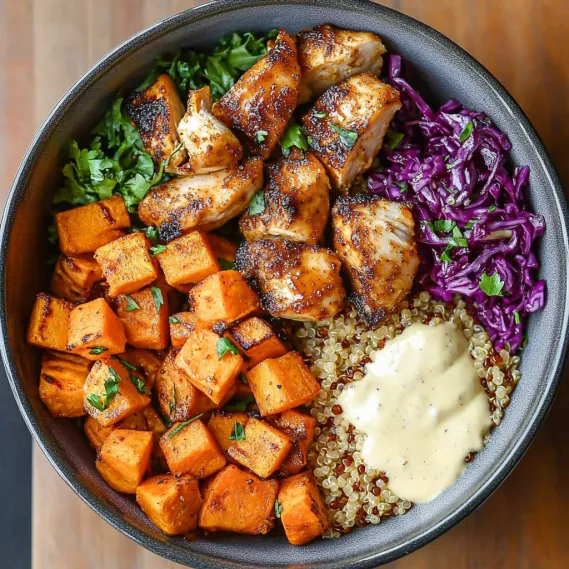
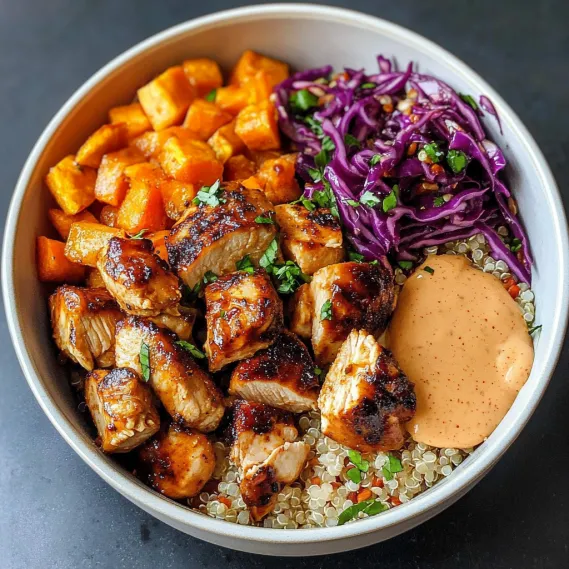
This Hot Honey Chicken Bowl inspired by Sweetgreen hits all the right notes with its cozy warmth and perfect kick. Juicy chicken meshes beautifully with oven-roasted sweet potatoes and tangy slaw, giving you that sweet-spicy combo that really hits the spot. From the soft quinoa base to the crunchy toppings, every mouthful keeps you interested while giving your body all the good stuff it needs in one seriously tasty package.
I found this dish during a super busy time when I couldn't handle fancy cooking. I was shocked that something so simple could taste so rich and complex. The smell that filled my home while it was cooking was amazing, and when I first tasted that buttery, chicken-soaked rice, I knew this would be a regular at our table. These days my family always wants it, and whenever I serve it to friends, they beg me for the instructions.
Key Ingredients and Smart Shopping Advice
- Chicken Thighs: Go for bone-in, skin-on ones to match cooking times with the rice. Take the skin off first to avoid too much grease. Look for plump, nicely colored pieces for best taste and juiciness.
- Sweet Potatoes: Pick solid ones without spots and deep orange flesh for better flavor and nutrients. Make sure they're all about the same size so they cook evenly.
- Red Cabbage: Get heavy, solid heads with bright purple coloring for tastier slaw. Skip any with brown marks or wilted outer leaves.
- Quinoa: Always wash it well before cooking to get rid of the stuff that makes it taste bitter. Check how fresh it is when buying.
- Honey: Raw and unfiltered types give you more interesting flavors and better nutrition. Buying local honey helps beekeepers near you and often has unique tastes.
I've noticed that better chicken really makes this dish stand out. Free-range thighs seem to give more flavor and stay juicier than regular store brands. Whenever I spot them on sale, I grab extra and freeze them just for when I want to make this dish.
Step-by-Step Cooking Guide
- Step 1: Start With Flavor Basics
- Heat your oven to 350°F. Put 4 tablespoons butter in a 9x13 baking dish and let it melt in the oven for about 3 minutes. Toss in one chopped onion and 4 crushed garlic cloves, mixing them into the butter until they're coated.
- Step 2: Build Your Rice Foundation
- Toss in 2 cups of well-washed long-grain white rice to the buttery onion mix. Pour on 2 cups chicken broth plus 1 cup water, giving it a gentle stir. Sprinkle with 1 teaspoon salt and 1/2 teaspoon black pepper.
- Step 3: Get Your Chicken Ready
- In a small bowl, combine 2 teaspoons paprika, 1 teaspoon dried thyme, 1 teaspoon garlic powder, 1 teaspoon onion powder, 1 teaspoon lemon pepper, and 1 teaspoon salt with 1/2 teaspoon pepper. Rub this mix all over 6-8 bone-in chicken thighs, pressing it in lightly.
- Step 4: Put It All Together
- Place your seasoned chicken pieces evenly across the rice mixture. Cover the dish tightly with foil, making sure it's well sealed.
- Step 5: Cook It Just Right
- Bake at 350°F for 30 minutes. Take off the foil, turn up the heat to 400°F, and bake another 20-25 minutes until chicken reads 165°F inside and the rice has soaked up all the liquid. Let it sit for 5-10 minutes before you serve it.
 Pin it
What I love most about this dish is the rice that forms around the edges of the pan. Those slightly crispy, super flavorful bits give such a nice contrast to the softer middle parts. My youngest always tries to claim these edge pieces, calling them 'the good parts.' When I make this for family get-togethers, everyone drifts toward the kitchen because the smell is so good, way before I even announce dinner's ready.
Amazing Rice Texture Tricks
I've figured out what makes the difference between okay rice and fantastic rice after making this dozens of times. First, you gotta wash the rice to get the extra starch off or it'll turn gummy. I put mine in a fine strainer and rinse until the water looks clear, usually about 2 minutes. Next, getting the right amount of liquid is super important. I've tried lots of combos and found that 1.5 cups of liquid for each cup of rice makes it perfect when baked - not too wet or dry. Last thing, you need a good seal with that foil during the first part of baking. Sometimes I even use two layers of foil to make sure no steam gets out.
Kid-Friendly Changes
My family loves the original version, but I've come up with some tweaks that work for different tastes. For kids who hate seeing onions, I blend them with the chicken broth before adding to the rice - you still get all the flavor without the chunks they don't want. When my mother-in-law visits because she watches her salt intake, I just skip adding salt to the dish and put a small salt dish on the table for everyone else. My teenage son always wants more protein, so sometimes I use 8 chicken thighs instead of 6, just overlapping them a bit to make them fit.
Smart Shortcuts For Busy Nights
When life gets crazy, I've found ways to make this dish even faster. The day before, I mix all the spices in a little container and leave it covered on my counter. I also chop the onion ahead and keep it in the fridge. With just these two things done, I can get this meal in the oven in under 5 minutes after coming home from work. Another time-saver is keeping a jar of minced garlic in the fridge - fresh garlic tastes better, but on hectic nights, the convenience wins out over the small flavor difference.
Side Dishes That Go Great With This
While this dish works fine by itself, I've found some sides that make it even better. A simple cucumber and tomato mix with red wine vinegar, olive oil, and a touch of sugar and salt gives a nice fresh contrast to the rich main dish. If you want something more filling, try roasted asparagus or broccoli with some lemon juice for color and nutrition. In summer, grilled corn on the cob with a bit of butter and fresh herbs makes it feel like a fancy backyard meal. My husband loves having crusty bread on the side to soak up any buttery sauce left on his plate.
Fixing Common Problems
After making this so many times, I've run into and solved several issues. If your sauce separates or looks grainy, you probably had the heat too high when adding cheese. Just turn down the heat and add a splash more cream while stirring constantly. If your chicken turns out tough, it was likely cooked too long - use a food thermometer and take it out right when it hits 165°F. For sauce that's too thick, just add a bit more chicken broth or milk until you get it how you like. These little fixes have helped me get perfect results even when cooking for big family parties.
 Pin it
Handy Cooking Tricks
- Add a splash of dry white wine to the pan before you pour in the cream for extra flavor
- Use a microplane to grate your asiago cheese so it melts more smoothly
- Let everything sit for 2 minutes after cooking before you serve it so the sauce gets just right
- For a fancy look, keep some fresh thyme leaves and a spoonful of grated cheese to sprinkle on top
- When reheating leftovers, add a little chicken broth or milk to bring the sauce back to life
Frequently Asked Questions
- → Can I get this ready ahead of time?
- Definitely! Prep everything up to 2-3 days earlier and store them separately in the fridge. Only the onions need to stay out in an airtight container to keep crispy.
- → Can chicken breast work here?
- Sure, but lessen the cooking time to avoid dryness. Aim for 5-6 minutes per side. Chicken thighs give better flavor and stay juicier.
- → How do I make this gluten-free?
- Use gluten-free flour or ready-made gluten-free crispy onions for toppings. Also check that your chicken stock is gluten-free.
- → Is there a vegetarian version?
- Swap the chicken for tofu or roasted chickpeas with the same spices, and use veggie stock for the quinoa.
- → Is the honey mustard sauce very spicy?
- It’s mildly spicy but adjustable. Add more red pepper to heat it up or reduce it if you want it milder.